How To Make An Airsoft MOSFET
Are you unhappy with the trigger response of your airsoft gun or rifle? Or perhaps you are dissatisfied with its ROF?
Do you know that you can considerably improve the performance of your airsoft gun by using a MOSFET switch?
Yes, just by installing a MOSFET on your airsoft gun or rifle, you can enhance its ROF and its trigger response. And the good thing is: you can do it yourself.
This article will give you detailed instructions on how to build a MOSFET switch and install it in your airsoft gun or rifle.
But First, You Will Need To Know What A MOSFET Is
A MOSFET (Metal-Oxide-Semiconductor Field-Effect Transistor) is basically a transistor that can switch electrical signals on and off.
It consists of two signal wires. One wire goes to the positive contact point of the trigger while the other wire goes to the negative contact point.
When you pull the trigger, the MOSFET is activated and sends direct current from the battery to the motor.
This will eliminate the electrical arcing that usually occurs at the contact points because only a small amount of electricity is allowed to pass through them.
MOSFET switches are usually installed in airsoft guns using AEGs. They use a different method of turning power on and off on the motor by using solid-state electronics.
MOSFET switches are considerably more efficient and dependable than the conventional trigger mechanisms used in airsoft guns.
Why Is A MOSFET Switch Important?
A MOSFET switch is important because it serves as a gate between the motor inside a gearbox and the trigger of the airsoft gun.
According to Quora, it is there to preserve or prolong the life of the contact points of the trigger in your airsoft gun.
It regulates the current coming from the battery going into your gun’s trigger assembly.
You will not be able to fire your AEG if the electrical circuit is not yet complete. With MOSFET installed, there is no possibility of electrical arcing.
Electrical arcing occurs in weak electrical connections which are typical in guns that don’t have MOSFET switches.
This condition results in carbon build up in the gun’s trigger contacts. Carbon deposits on contact points reduce their service lives.
If your gun does not have a MOSFET, the negative wire coming from the battery will be connected directly to the negative terminal of the motor and the positive wire will be connected directly to the trigger contact and then to the motor’s positive terminal.
When the trigger is pulled, power is sent from the battery to the motor. But if the battery has a high discharge rate, there will be electrical arcing.
This is bad for the trigger contacts because it will burn them away. This is the basic reason why you should use a MOSFET switch.
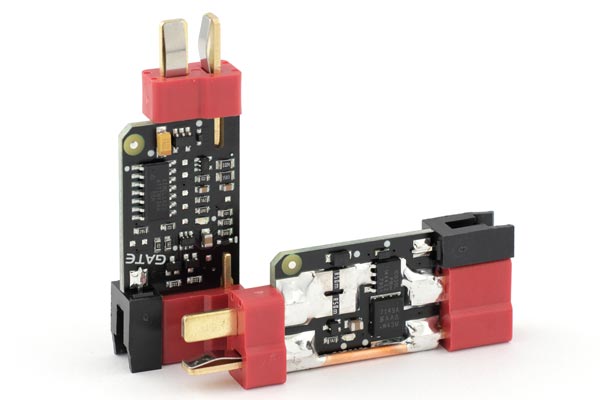
To build a MOSFET, you will need the following materials:
- MOSFET – IRLB3034PBF
- Diode – 5KP18A
- Metal Film Resistor – ¼ watt, 2.2k ohm, 1%
- Metal Film Resistor – ¼ watt, 100 ohm, 1%
- Mini Aluminum Cooling Adhesive Back Heatsink
- Electrical Wires
- Battery Connector
- Nut and Bolt
Steps In Building A MOSFET
According to Unconventional Airsoft, these are the steps that you need to follow in building a MOSFET switch.
Step One – there is a middle pin on the MOSFET. You need to cut off because there is no need for it. The rear tab and this middle pin are the same electrically. You will only use the tab.
Step Two – get the 2.2k resistor and connect it to the tab.
Step Three – solder the resistor to the MOSFET. This will ensure that the MOSFET will turn off correctly.
Don’t use excessive heat when soldering the resistor to the MOSFET. Just use enough soldering material to ensure a stable connection.
Step Four – Connect the 100 ohm resistor to the Gate
Step Five – Ensure that you have connected the Gate to the right pin. Solder once but check it twice.
Step Six – Get the other components as well as the motor with its negative wire and connect them to the MOSFET using the nut and bolt.
Step Seven – Make sure that the metal parts of the different components are not touching each other except where they are supposed to.
This is very important to avoid short-circuiting the whole MOSFET assembly.
Step Eight – The other connections will be that of the electrical wires. Two wires should be twisted together to create a pair consisting of a positive and negative.
Refer to UNCONVENTIONAL AIRSOFT, as to how they should be connected to the MOSFET assembly. The whole assembly will be insulated by the heat sink.
Step Nine – after you have followed all the instructions on the referred website, you will now have a MOSFET switch to connect to your AEG.
Please take note that if you have followed these instructions, you will have created just a basic MOSFET switch.
This assembly does not have fire control, low battery warning, active braking and the other fancy features of a computerized MOSFET switch. It is robust, yes, but it is as basic as it can be.
What Other Things Can A MOSFET DO?
Aside from protecting and prolonging the life of the trigger contact points, there are other improvements that a MOSFET can do to your airsoft gun.
This switch can increase your ROF or rate of fire. That means you can increase the amount of ammo that you can fire at any one time.
According to Answers Yahoo, the MOSFET can also enhance the efficiency of the gun’s electrical system and it will support firing modes that are fine-tuned such as 3 round bursts. It will also improve the trigger response of your airsoft gun.
What A MOSFET Cannot Do
A MOSFET is designed to function in a certain way. There are other things that this switch is not able to do.
For instance, a MOSFET switch cannot increase the FPS or feet per second speed of your AEG.
If you don’t have a computerized MOSFET switch, don’t expect it to provide you fancy functions such as fire control, active braking, warning if the batter is already low, or any other special features.
Here is a YouTube video that will explain much further how you can build a MOSFET switch.